AUDIOTUTS Updates |  |

- Workshop #105: Fight the Fight by Dark Disco Club
- Mastering Elements Part 3: Multi-band Compression
- Quick Tip: MIDI Translation – MIDI to Keystrokes
| Workshop #105: Fight the Fight by Dark Disco Club Posted: 09 Aug 2010 05:48 PM PDT At Audiotuts+ we regularly put up a reader track for workshopping and critique (find out how to submit a track). This is how it works: you upload your song, and every week or so we’ll publish one here and step away from the podium. The floor is yours to talk about the track and how the artist can fix problems in and improve upon the mix and the song.
This track has been submitted for your friendly, constructive criticism. They have put their track (and their heart and soul) in your hands to learn and get useful feedback.
Fight the Fight by Dark Disco ClubArtist’s website: darkdiscoclub.com Description of the track:
Download audio file (FightTheFight.mp3) Terms of Use: Users can stream the track for the purposes of giving feedback but cannot download or redistribute it. Have a listen to the track and offer your constructive criticism for this Workshop in the comments section. Submit Your Tracks for WorkshoppingNeed constructive criticism on your own tracks? Submit them using this form.
This posting includes an audio/video/photo media file: Download Now |
| Mastering Elements Part 3: Multi-band Compression Posted: 09 Aug 2010 03:59 AM PDT As many of you will know by now mastering is a subject with many facets. Learning how to successfully treat your tracks after your mix is complete generally requires a good amount of experience but some solid technique will get you going in the right direction. To get this essential theory embedded I have decided to chop a typical mastering chain into nice bite-sized pieces. This way we can focus on each processor one at a time. At the end of the series we’ll look at the whole chain in action. This tutorial looks at multi-band compression and what it can do for you during a mastering session.
Step 1: Multi-band ProcessingIf you’re not familiar with multi-band processing it may seem a little daunting. For most beginners the sight of the average multi-band compressor plug-in is enough to send them running to the hills. In reality it’s not as complex as you may think and these processors can be extremely useful. Most DAWs now include some kind of multi-band processor (usually a compressor/expander) as standard. Although they may differ in look and layout, they all carry out pretty much the same function. If up until now you have felt that these processors are a little complex in nature it’s time to dive in head first, as they can be extremely useful.
 Cubase 5.5′s multi-band compressor. Simply put, if you can use a compressor then a multi-band version should present you with no problems. The average multi-band compressor is really no more than a number of compressors (often three or four) housed in the same plug-in. Each one of these compressors is then focused on a specific frequency band, decided by the user.
 Ableton Live’s multiband dynamics plug-in. This frequency dependent compression gives you the ability to home in on specific instruments or areas of your mix and boost or attenuate them in a very accurate fashion. This sort of treatment often gives you a much more transparent result than equalisation. In the following steps we’ll look at the most common techniques for using these processors in a typical mastering environment. I’ll be using Logic Pro’s ‘Multipressor’ but any multi-band processor should be fine.
 Logic Pro 9′s Multipressor plug. Step 2: Isolating FrequenciesThe first thing to master here is isolating specific frequencies. Most multi-band compressors have moveable ‘bands’. These bands have upper and lower limits and a clear read out of the frequency you are using. This system is often combined with the ability to solo and bypass each band, so homing in on specific instruments should be pretty straight forward. To demonstrate this I have used an existing loop and homed in on the snare. In the following clips and screenshots you can see the process used.
 The loop used was produced entirely in Record 1.5 and imported in to Logic Pro 9. The loop as exported from Record 1.5.
 The Multipressor is then used to home in on the frequency where our snare’s ‘snap’ resides. The snare’s frequency is isolated. Step 3: Subduing Mix ElementsWith the frequency of our snare identified we can start to treat it. First let’s look at reducing its bite with compression. Simply bring the threshold down to a point where gain reduction occurs when the snare hits. No you can tweak the attack and release times to create a transparent compression effect. It really is this easy. Once your compressor is firing correctly, you may want to fine tune the ratio and threshold amounts but you should find it very straight forward to treat your chosen area. This is just like using a standard compressor, same parameters, same results… just frequency dependent.
 The snare is compressed. The loop with the softer snare sound. Step 4: Boost and ControlAnother great way of using these processors is to boost certain frequency zones. Of course this can be achieved with an equaliser but using a multi-band compressor you retain a huge amount of dynamic control. First the low end is targeted. …Then the high end. To demonstrate this technique I have boosted the high and low frequencies in level. I then applied enough compression to reduce these bands to around their original level. This may seem counter productive but it effectively reduces the dynamic range of your chosen band and ultimately makes it appear louder.
 The low and high end are boosted and controlled simultaneously. The final treated loop. And with a bit of limiting for volume.
|
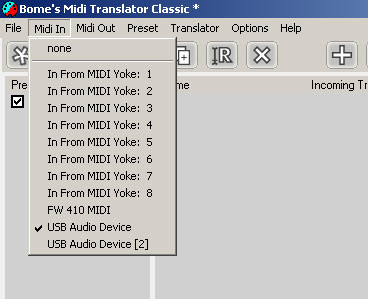
| Quick Tip: MIDI Translation – MIDI to Keystrokes Posted: 08 Aug 2010 06:57 PM PDT There are certain function and keyboard shortcuts a musician would like to use during a mixing or a live session that are not MIDI mappable. In this tutorial I am going to show you a way of mapping virtually any keyboard shortcut to your MIDI controller extending the functionality of your live set or mixing session. We are going to use a program called Bome’s MIDI Translator. The classic edition of the software is free for personal use (PostcardWare). For more info on what PostcardWare is click here. You can download Bome’s MIDI Translator Classic from here. There is a Pro edition of the software with more capabilities. The classic version will do for our purposes. The is also a beta version for OS X that Mac user can use. Setting UpInstall the software and follow instructions as usual. Open up the software after installation. From the MIDI In menu select the MIDI port that your controller is connected to.
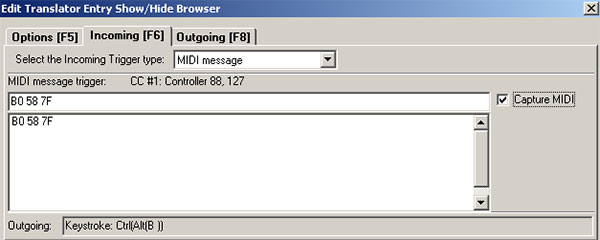
 Later on you might want to utilise various controllers. Just open up another instance of the software and select your other controller’s MIDI In port. In the pro version there is a more efficient way to just select multiple MIDI inputs. Create an Incoming ActionLet’s create an incoming action, now. Let’s say that I want to hit a MIDI button from my controller to show and hide Ableton Live’s browser. The shortcut for this function is CTRL+ALT+B. From the menu, select Translator->Add. Rename the new translator to Show/Hide Browser. Double click it and go to Incoming or hit F6. Leave trigger type as MIDI message. Check the Capture MIDI box and click the button on your MIDI controller. A hexadecimal value broken up into three parts appears in the MIDI message trigger the first being the associated MIDI channel, the second being the controller number, and the third being the controller CC value. Check the Capture MIDI box again to deactivate it.
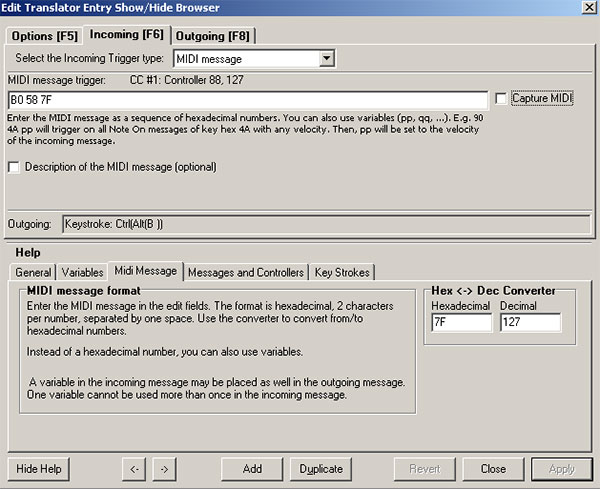
 The program also has a utility for converting Hexadecimal to Decimal values.
 Create an Outgoing ActionClick the Outgoing tab and select Keystroke Emulation as Outgoing Action type. Leave the default Key Press or Sequence selected, click inside the box and hit CTRL+ALT+B. The combination of keys appears inside the box. If you make a mistake, just hit the Clear button and start inputting the key sequence again.
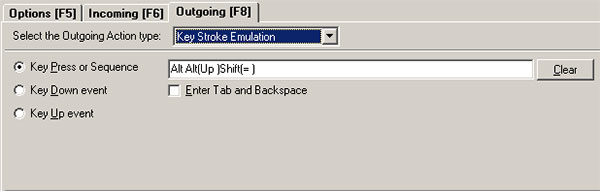
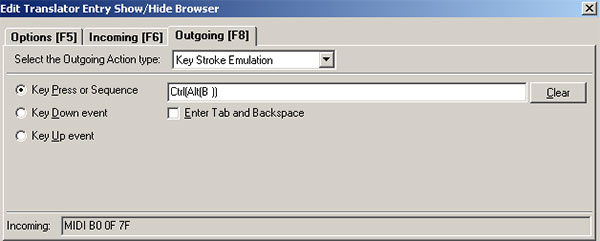 Hit Apply. Now if you go to Ableton Live or any other application that utilizes this shortcut, you can activate it by just hitting the MIDI button on your controller! Another ExampleI’ve read some questions on a couple of music forums about being able to use MIDI keys to show and hide the contents of a group track in Ableton Live. The shortcut key once we have the channel selected is ALT+Up Arrow to select the Track Title Bar, then SHIFT++ to expand the group. To hide it, the shortcut is just the - key. Let’s see how we can do that. For this to work, you need to have your MIDI controller button set as a toggle control meaning that it should have one CC value as you press it once, then another second value as you press it once more. Then the process repeats. Consult your MIDI controller’s manual for more details. I’ve set mine up so that it outputs 0 and 127 respectively. Add another translation as before and name it Show Group. Go to Incoming tab and check the Capture MIDI box. Click the button on your keyboard once. Uncheck Capture MIDI and go to Outgoing tab. Select Key Stroke Emulation and hit the sequence of keys which is ALT+Up Arrow, then SHIFT++.
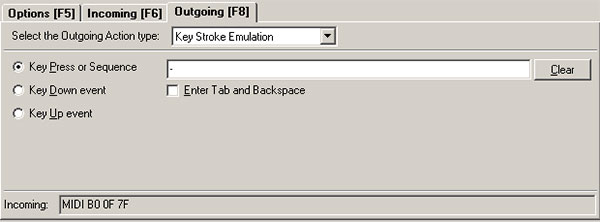
 Hit Apply and Close. Select the Show Group Translation and duplicate it (CTRL+D). Rename the newly created translation to Hide Group. Double click it and go to the Incoming tab. Check Capture MIDI and hit the button one more time. The second toggle value appears in the field. Uncheck Capture MIDI. Lastly, on the Outgoing tab, the Key Stroke Emulation should be already selected. In the field underneath click the Clear button and once clicked inside the field press the - button on your computer keyboard. Hit Apply and Close. Now, if you go to Ableton Live and create a Group the button you just mapped will expand the Group with the first click, then hide it with the second.
 Infinite PossibilitiesAs you can understand, the possibilities are endless. You can do so much more with this program than we did here. You can create your own mappings and activate or deactivate the ones you want. You can also fire up multiple instances of the software to include another MIDI Input or just go for the Pro version where multiple MIDI Inputs are selected in one part of the interface.
|
| You are subscribed to email updates from Audiotuts+ To stop receiving these emails, you may unsubscribe now. | Email delivery powered by Google |
| Google Inc., 20 West Kinzie, Chicago IL USA 60610 | |
AUDIOTUTS Updates Part 1
AUDIOTUTS Updates Part 1
AUDIOTUTS Updates Part 1
Tags: AUDIOTUTS Updates, AUDIOTUTS Updates watch online, full AUDIOTUTS Updates video, AUDIOTUTS Updates download, AUDIOTUTS Updates torrent, free AUDIOTUTS Updates, AUDIOTUTS Updates megavideo, AUDIOTUTS Updates full, AUDIOTUTS Updates eng sub
0 comments:
Post a Comment