AUDIOTUTS Updates |  |

- Workshop #112: Electric Funk by DJ Dost
- New Higher Envato Marketplace Rates!
- Additive Synthesis in Reason – Part 1
- Quick Tip: Tempo Control Automation in Session View in Ableton Live
| Workshop #112: Electric Funk by DJ Dost Posted: 25 Aug 2010 04:13 PM PDT At Audiotuts+ we regularly put up a reader track for workshopping and critique (find out how to submit a track). This is how it works: you upload your song, and every week or so we’ll publish one here and step away from the podium. The floor is yours to talk about the track and how the artist can fix problems in and improve upon the mix and the song.
This track has been submitted for your friendly, constructive criticism. They have put their track (and their heart and soul) in your hands to learn and get useful feedback.
Electric Funk by DJ DostArtist’s website: djdost.com/ Description of the track:
Download audio file (DjDostElectricFunk.mp3) Terms of Use: All Rights Reserved 2010 Have a listen to the track and offer your constructive criticism for this Workshop in the comments section. Submit Your Tracks for WorkshoppingNeed constructive criticism on your own tracks? Submit them using this form.
This posting includes an audio/video/photo media file: Download Now |
| New Higher Envato Marketplace Rates! Posted: 25 Aug 2010 02:28 AM PDT For four years the Envato Marketplaces have helped authors around the world earn an income selling their digital wares. Along the way we’ve grown from one marketplace to seven, with more on the way. We’ve gone from hundreds of members to hundreds of thousands. Items from our marketplaces have appeared in projects for companies big and small, all around the world. And most importantly of all, we’ve had thousands of authors cash out earnings, ranging from a bit of money for a big weekend to sums in the tens of thousands of dollars a month! It’s been an amazing ride, and here at Envato along with our commitment to growing Tuts+, we are completely committed to making our marketplaces the best around. That’s why I’m very excited today to announce that as of the end of September we are rolling out some dramatically improved rates for all our exclusive authors! As the sites have grown, so has our revenue. As we increase in volume and size we’re able to push back more and more to the authors. This is in fact our third rates increase now, and it’s always a really happy day when we get to make the changeover and start putting more money in author’s hands.  50-70% with a $75k scaleThe new rates, which go into effect at the very end of September, will see new exclusive authors get 50% of every sale out of the gate, with their commission rising up to 70% as they sell more. The volume of sales needed to get to 70% has been dramatically reduced from the old $300,000 mark, down to just $75,000. While that’s still a lot of money, it will mean dozens of our existing authors will suddenly catapult up to the highest rate and every author will see a big increase to their earnings. If you’re wondering just how much people sell on our marketplaces, perhaps a stat will help. Our top seller across the marketplaces has sold just shy of a whoppingly huge half a million dollars in gross sales! That’s an enormous amount of money, most of which happened in under a year. Lest you think that’s just for the biggest marketplaces, in fact on every single one of the seven marketplaces, we have authors whose take home earnings are in the four figures each month! So that’s authors selling not just on ThemeForest, our marketplace for websites, but also the marketplaces for graphics, video, audio, 3D, Flash and code and scripts. How much could you make selling your work? Envato Notes – new Community Blog! You can get the full details of the big Envato Rate Increase on our brand new Envato Community blog – Envato Notes. Notes, which launched just last week, is going to be the hub of the entire Envato / Tuts+ community with news about our sites, interviews of people who work on our sites, tips, giveaways, competitions and much more. If you haven’t seen it already, I highly recommend heading over to Envato Notes and subscribing to the feed! Happy Birthday Authors!So on the fourth anniversary since our first marketplace FlashDen first hit the web, I’d like to take a moment and say Happy 4th Birthday to all our authors. Thank you so much for choosing to sell with us. Thank you so much for being a part of our amazing community. Thank you for helping us make the Envato Marketplaces what they are. One More Thing …With the Birthday Bundle now finished, our massive rates change announced, well … to borrow a line from Mr Jobs, there’s just one more thing. Next week, I’ll be back with a very exciting announcement – a whole new Envato Marketplace! Yep it’s one heck of an August for us here at Envato, so stay tuned for even more big news! Woohoo!!!
|
| Additive Synthesis in Reason – Part 1 Posted: 24 Aug 2010 11:59 PM PDT This tutorial will show you how you can create an additive synthesizer using a combinator in Reason. Additive synthesis is one of the less common forms of synthesis in use today, but it can be used to create some great sounds. Furthermore, following this tutorial is a great way to improve your understanding of some of the fundamental principals of sound and synthesis in general.
Step 1The first step is to understand what we are trying to achieve in this exercise. If this seems overly complicated or confusing don’t be put off, the actual exercise is relatively simple, and should make things clear as you follow it through. Additive synthesis is a method for building up complex tones from simple ones. Most sounds we hear in the real world, for example a piano or a guitar are not just simple, linear wave shapes like a sawtooth or a square. They are in fact made up of many complex overtones, all at different frequencies and layered up over a ‘base’ or ‘fundamental frequency. A sine wave is a wave shape that has very few harmonics or overtones, and is essentially only the fundamental frequency of whatever note or frequency it is pitched to play. By layering up many sine waves we can artificially create the effect of a complex harmonic tone, with complete control over each individual overtone or harmonic in the sound. Step 2Now we are ready to begin. The first thing we need to do is to build a combinator patch which will allow us to generate a large number of sine waves at once, from a single key press or MIDI note trigger. For this we will need a combinator. After creating a combinator in your Reason file, create a full size (14:2) mixer inside the combinator, and then create a subtractor synthesizer.
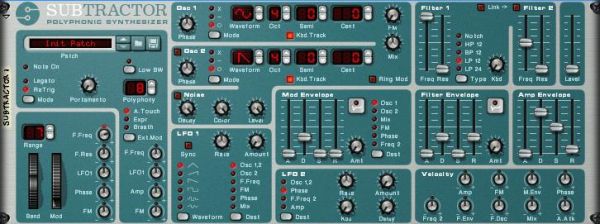
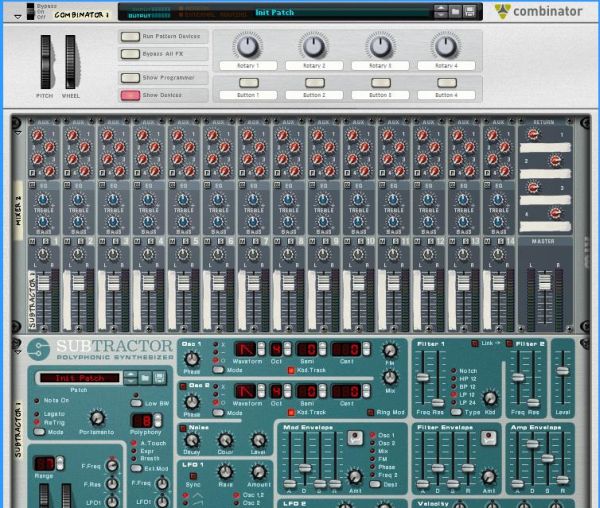 Step 3We now need to program the Subtractor to generate a simple sine wave. Firstly initialize the patch on the Subtractor. Once this is done change the wave shape on Oscillator 1 to a sine wave shape. Open the filter all the way and turn the volume all the way down. Turn the velocity>filter freq knob to the neutral position. Your patch should now look like this:
 Step 4We will need a lot more than one sine wave generator to create a complex tone, so now create an additional seven subtractors inside the combinator. Once you have done this right click on the top one (the one where we edited the patch to generate a sine wave) and select ‘copy patch’. Now paste this patch onto each of the other Subtractors by right clicking on each in turn and choosing ‘paste patch’. You will now have a combinator with 8 Subtractors inside it, each with the same simple sine wave patch. Step 5Our basic template is now complete. You should now save the combinator patch at this point so that you can easily return to this stage and start experimenting with different additive synthesis sounds. We can now et into the meat of the exercise and begin generating our tones. For the first tone I am going to create a soft organ/keyboard type tone. Step 6Find the Subtractor that is at the very top of the pile. On this subtractor turn up the volume all the way. Play a note on your MIDI keyboard. You should hear a very simple sine wave tone. If you do not have a MIDI keyboard you will find it useful at this stage to create a simple loop in the sequencer window, so that one note repeats itself – you will be able to use this to hear the changes you make to the sound without having to click on the on screen keyboard. This simple sine tone is going to be the base note for our sound, or the fundamental frequency. Download audio file (Audio Example 1.mp3) Step 7On the next Subtractor down turn the octave for Oscillator 1 up from 4 to 5. Now increase the volume up to about 85. You should now hear a higher tone joining your original tone when a note is played. Download audio file (Audio Example 2.mp3) Step 8On the third Subtractor down turn the octave control for Oscillators 1 up to 5, and the semitone control up to 7. Now turn the volume up all the way. This will sound like an extra note has been added to the sound, at an interval of a 7th. This is not what we want as we are trying to create the impression of one tone, rather than two or more. Lower the volume back down. When you get down to about 55 you should hear that the sound generated by this Subtractor starts to sound like a part of the overall tone rather than a note in its own right. Download audio file (Audio Example 3.mp3) Step 9On the fourth subtractor turn the octave up to 6, but leave the semitone control at zero. Again, turn up the volume so that you can hear this new layer to the tone but not so much that it stands out as a separate tone in it’s own right. Somewhere between 50 and 60 should be about right. Download audio file (Audio Example 4.mp3) Step 10On the fifth Subtractor in the pile turn the octave to 6 and the semitone to 7 – now bring the volume up like you have with the other devices. As we go further up the frequency spectrum and the overtone we add become higher and higher you will find that you don’t need to turn them up as loud as the lower pitched tones. This time leave the volume at about 40. Download audio file (Audio Example 5.mp3) Step 11For the sixth Subtractor we are going to put the octave up to 7 and leave the semitone alone. Remember that when we only change the octave control the tone we are adding is effectively the same note as our fundamental frequency, so you can sometimes get away with having these overtones louder than other, more discordant overtones. We are starting to get into the really high frequencies now, and the overtones we are adding at this stage will add some real brightness to the tone. I have decided to have quite a bright sounding organ tone, so I have left the volume for this Subtractor at 50, but you may wish to choose your own setting. Download audio file (Audio Example 6.mp3) Step 12This time we are going to push the octave up to 7 and the semitone to 7 again. This is another very bright overtone, so you can adjust the volume of it according to your taste. I have left it at 38. Download audio file (Audio Example 7.mp3) Step 13So far all of our overtones have been either the same note as our fundamental frequency, at different octaves or at an interval of a 7th, at different octaves. These intervals are nice and musical, and make for a pleasant sound, using other, more unusual intervals as our overtones can create more interesting and unusual sounds, but can sound out of key unless you are careful. As you get higher and higher up the frequency spectrum our ears find it harder to distinguish between different notes, and we can get more adventurous with our choice of interval without worrying so much about sounding out of key. As an example we are going to tune this last Subtractor to a more unusual interval. Turn the Oscillator 1 octave on the last Subtractor up to 9. Now turn the semitone control up to 1. We are now adding an overtone which is effectively just 1 semitone apart from our fundamental, only at a much higher octave. In many cases playing 2 notes next to each other sounds wrong, but as we are playing so high up this final overtone just adds more brightness, as long as it is not too loud. In this example I have chosen to set the volume at 38. Download audio file (Audio Example 8.mp3) You should now have a basic organ type tone, which you can play like any other instrument or combinator patch in Reason. This concludes Part 1 of the tutorial. In the next part we will look at how some modulation can make our patch sound more realistic, and how further modulation of the individual overtones can create different sounds, with almost limitless possibilities.
|
| Quick Tip: Tempo Control Automation in Session View in Ableton Live Posted: 24 Aug 2010 09:22 PM PDT Like all DAWs, Ableton Live allow users to automate the tempo and signature of a given set. Unlike other DAWs, Ableton Live incorporate the session view where tempo changes can be automated there as well by renaming the Scene names accordingly. We are going to examine various ways of achieving this and also another way of automating tempo between two values by using external software.
Automating Tempo by Renaming ScenesTill now, we know that by properly renaming Scenes in Ableton Live we can cause the tempo to jump to our desired value. Scenes can be renamed by clicking on a particular Scene in Session View, then hit CTRL(CMD for Mac)+R then type in the new name. Scene names can be both descriptive and functional; if Live detects a viable tempo and/or time signature as part of a scene name, the project will automatically adjust to these parameters when the scene is launched. To assign a tempo to a scene, select the scene and rename it with a viable tempo (e.g., “96 BPM”). Any tempo can be used, as long as it is within the range allowed by Live’s Tempo control (20-999 BPM). To assign a time signature to a scene, rename the scene with a meter in the form of “x/y” (e.g., “4/4″). Any time signature can be used, provided it has a numerator between 1 and 99 and a denominator with a beat value of 1, 2, 4, 8 or 16. Tempo and time signature changes can coexist within a single scene name, and can appear in any position as long as they are separated from each other by at least one character. For example, “2/4+102 BPM”, “112 BPM;7/8″ and “110 BPM Verse 3/4″ are all scene names that will cause simultaneous meter and tempo changes.
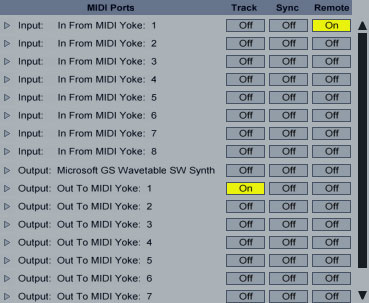
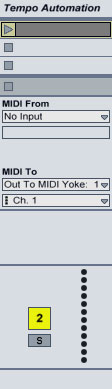
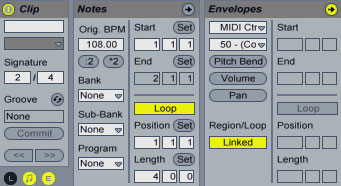
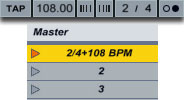 The renamed Scene above, when launched, will cause the master TEMPO to jump to 108BPM with a signature change of 2/4. Using Dummy Clips to Gradually Automate Tempo ControlThe “problem” with this method is that the master tempo jumps to the required BPM. What if our live set incorporated a slow gradual tempo change? We know that we can easily achieve that in Arrangement View but there seems no way to do that in Session View. We need to make use of dummy clips and external software. Dummy clips are essentially empty midi clips that contain modulation information for other parameters in our Live set. The extra software we are going to be using is a free software called MIDI YOKE. MIDI YOKE is a MIDI Patch Cable driver. It’s a Windows multimedia driver that allows you to connect the MIDI output from one program to the MIDI input of a different program. Mac users already have this functionality in the form of the IAC driver. Once downloaded and installed head over to Live’s preferences in the Midi Sync tab. Under Midi Ports activate Remote for the Input In From MIDI Yoke: 1 port. Activate Track for the Output: Out to Midi Yoke: 1 port.
 Exit Preferences. Create a midi track and set it’s output type to Out To MIDI Yoke: 1. Leave Output Channel to 1. Midi Yoke allows you to utilize all 16 midi channels if so desired.
 Double click on an empty clip slot to create a dummy clip. On the Clip View hit the E icon to show the Envelopes Box. Leave the Loop switch activated. From the Envelope Editor’s first drop down box(Device Chooser), select Midi Ctr and from the second(Control Chooser) select a parameter controller. In my case, I chose 50. Set the Loop Length to the bars, beats and sixteenths that you want your automation to last. In my case, I set it to 4 bars.
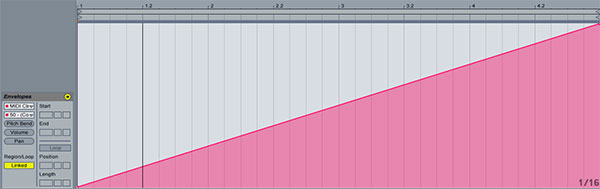
 Now, please, pay attention as it may seem a little bit tricky. On the red line representing the envelope’s control automation, create two breakpoints one at the beginning and one at the end setting the first one to 0 and the second one to 127.
 Launch the dummy clip by hitting the Clip Launch Button, then press SPACE bar to stop. Activate Midi Map Mode, click the tempo at the right of the TAP button(make sure to click the left side of the number where the Coarse value of the tempo is located) and click space bar again to launch the dummy clip. Hit the space bar once more to stop the clip. On the Midi Mapping at the left, you can see that the CC 50 controller number has been assigned to the master Song Tempo. Change the min and Max values to 60 and 187 values respectively or any other values whose difference is 127(for instance 100 and 187). Obviously the range you choose should cover the values you are planning to use to complete your automation. Exit Midi Map Mode. The reason we set our range as such is that it will allow us to have whole number increments on the Master Tempo instead of decimal ones. As you know, the breakpoint envelope values range from 0 to 127 so setting a min and max Song Tempo values whose difference is 127 while on Midi Map Mode, allows us to work in single unit increments of the song tempo.
 Now, let’s say we wanted to execute a gradual tempo from 100 to 120 BPM. All we needed to do is subtract the value of min value of 60 from both values and adjust our breakpoints accordingly.
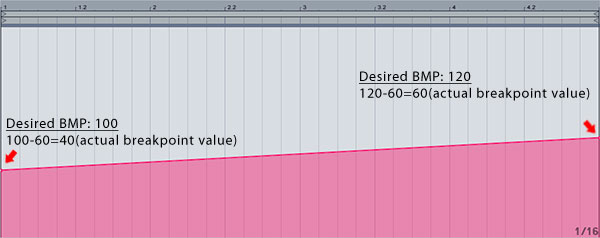 Remember that you always subtract the min value you have set while on midi Map Mode, so if your range had a minimum value other than 60, this value should be used for subtraction. Now you can deactivate the Loop switch for the dummy clip, launch it and see the song temp gradually increasing from 100 to 120 BPM in the duration of 4 bars! This way, whenever you want an automation change like that in your live set, you can create similar dummy clips and launch them either on their own or as part of a Scene launch. Let me know if you have any questions and thanks for your time!
|
| You are subscribed to email updates from Audiotuts+ To stop receiving these emails, you may unsubscribe now. | Email delivery powered by Google |
| Google Inc., 20 West Kinzie, Chicago IL USA 60610 | |
AUDIOTUTS Updates Part 1
AUDIOTUTS Updates Part 1
AUDIOTUTS Updates Part 1
Tags: AUDIOTUTS Updates, AUDIOTUTS Updates watch online, full AUDIOTUTS Updates video, AUDIOTUTS Updates download, AUDIOTUTS Updates torrent, free AUDIOTUTS Updates, AUDIOTUTS Updates megavideo, AUDIOTUTS Updates full, AUDIOTUTS Updates eng sub
0 comments:
Post a Comment