AUDIOTUTS Updates |  |

| How to Add Variation to Drum Loops in Ableton Live Posted: 01 Jul 2010 04:06 AM PDT In this tutorial we’re going to examine some quick and easy ways of adding more variation and interest to our drum loops. Other kind of loops can also benefit, as well, depending on the providing material. Ableton Live 8.0.9 is the DAW of choice here and we are going to be utilizing native effects and a few external ones. Some of the techniques can also be applied to other DAWs. Step 1: Loading Up a Reference LoopDrag a reference drum loop to an empty audio track. I have used a loop from Live’s library. It was a MIDI loop that I converted it to audio for demonstration purposes. We are currently in the Session View and our current BMP is set to 135 BMP. Listen to the drumloop: Download audio file (drumloop.mp3) Step 2: Using EnvelopesDouble-click the drumloop clip and and click the "E" icon at the bottom to show the Envelope Box. From the Envelope Editor, select Clip from the Device Chooser, also select Sample Offset from the Control Chooser. Switch to Draw Mode by hitting CTRL(CMD)+B and start drawing some envelopes on the Envelope Editor on top of the waveform. Sample offset modulation makes the most sense for rhythmical samples, and is only available for clips that are set up to run in the Beats Warp Mode.
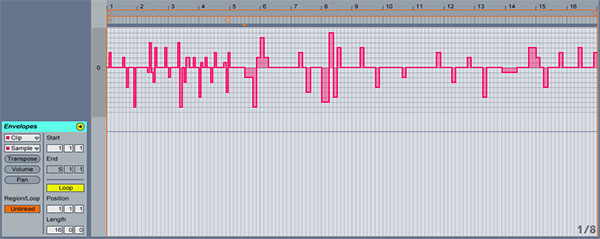
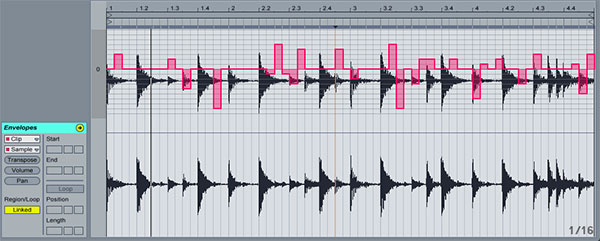 Play the clip and listen to the result. How is this done? Imagine the audio is read out by a tape head, the position of which is modulated by the envelope. The higher a value the envelope delivers, the farther away the tape head is from its center position. Positive envelope values move the head towards the “future”, negative values move it towards the “past”. Fortunately, Live performs the modulation in beats rather than centimeters: A vertical grid line is worth a sixteenth note of offset and the modulation can reach from plus eight sixteenths to minus eight sixteenths. You can select different grid settings to draw your envelopes or no grid at all for really detailed programming. Experiment with drawing various envelopes while the loop is playing. Step 3: Extending the Clip FunctionalityRight now, our loop extends over 4 bars so the rhythmic variety we created, will be repeated over 4 bars. On the Show Envelope Editor set the Region/Loop to Unlinked (it will get highlighted in orange or any other color according to the color theme you are using). Just on the right of where you clicked, we can see the Loop Length currently set to 4 bars. The other two input boxes next to it adjust the beats and sixteenths accordingly. By clicking and dragging up or down any of those boxes, you can increase or decrease their values. You can also click in one of the boxes and input a value manually. Let’s set the Loop Length to 16 bars. The envelope editor extends to accomodate for our new loop length settings. By drawing more envelopes further on the right of our current ones, we create even more variations to out loop that will extend for 16 bars. You can extend the loop length to a really high number creating even longer variations.
 Listen to the loop so far: Download audio file (drumloop-extended.mp3) Step 4: Follow ActionsBy utilizing Follow Actions, we can further randomize the already varying rhythmic behaviour of our loop. Create 3 more instances of our drumloop clip, position the resuting clips below the original one. For each clip, modify the Sample Offset envelope to your liking to create different sample offset effects. Click the first clip, then hold SHIFT and click the last one to multiple select all clips. Hit the “L” icon at the bottom of the clip view to show the Launch Box for all selected clips, if it’s not already selected. From the Launch Box on the right, under the Follow Action text, set 16 for bar length(the box on the left) and select “Any” from the dropdown box underneath. Leave the box underneath (Follow Action Chance A) to the default value of 1.
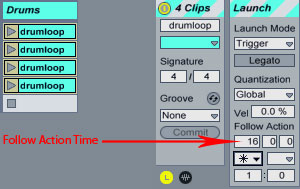 Start the first clip. When the clip reached the end of 16 bars, one of the four clips will be randomly launched and so one, making the rhythmic variation quite unpredictable. We can further modify the Follow Action Time for each clip to last only the amount of bars, beats and sixteenths we desire. Just select each clip and set the time accordingly. What we could also do is set all our clips’ Follow Action Time to, let’s say, 4 bars, then with all clips selected, activate the Legato Mode Switch.
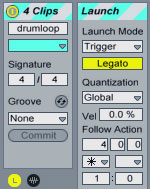 Now start the first clip for that matter. After 4 bars, a random clip will launch at the playback position where the previous one stopped and so on. This can create almost infinite rhythmic variations that will never seem to be repeating. Try and see! Of course, you can combine various Follow Action Time values along with the Legato mode and create more copies of the original clip for total chaos. Or you can map the various clips to keys on your computer keyboard and start firing clips as you wish. By activating the Global Record Button, you can record your performance to the arrangement view while it’s playing. Step 5: Adding an Audio Effect – Beat RepeatDrop a native Beat Repeat plugin as an insert effect on the drumloop audio channel. Beat Repeat is a great native plugin for creating repeating and stuttering effects to any signal that’s been fed throught it. In our particular example I went for a mild repeating effect but you can experiment with different settings according to the nature of your sound. Beat Repeat settings:
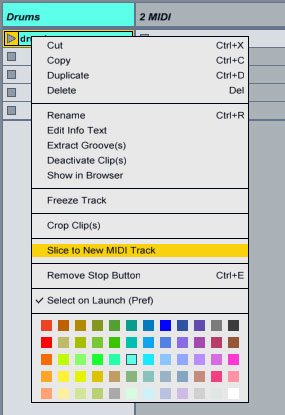
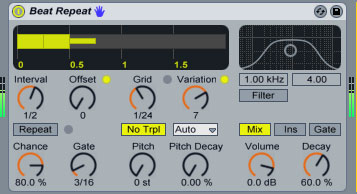 Play around with the settings, particularly with the Interval, Offset, Chance and Variation to achieve varying results. You can also map some of the controls to macro knobs creating a more managable performance device. Listen to the loop with Beat Repeat applied to it: Download audio file (drumloop-beat-repeat.mp3) Step 6: Slicing to New MIDINow, let’s try another method. Delete the duplicated clips leaving only the original one. Also, delete any follow actions and envelopes we have previously created. Revert the state of the drumloop to the its original state that it was on Step 1. Right click on the audio file and select Slice to New MIDI Track. Accept the default settings (Create once slice per: Transient, Slicing Preset: Built-in) and click OK.
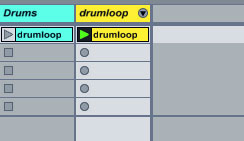
 A new MIDI track will be created, containing a MIDI clip. The clip will contain one note for each slice, arranged in a chromatic sequence. A Drum Rack will be added to the newly created track, containing one chain per slice. Each chain will be triggered by one of the notes from the clip, and will contain a Simpler instrument with the corresponding audio slice loaded.
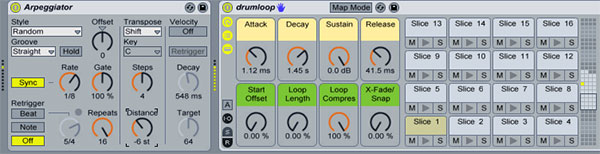
 Step 7: Adding a MIDI Effect – ArpeggiatorDrag an Arpeggiator MIDI effect on the newly created track. Set Style to Random, Rate at 1/8 and experiment with other settings. Take a look at the screenshot to see what worked for me. Start by playing a C1 on your computer or MIDI keyboard. The Distance value would have to be set accordingly depended on the number of slices that have been created from the previous step. As you trigger a C1 note notice how the drum rack pads are randonly triggered. The small dots at the right of the pads will give you a quick overview on the randomness notes are triggered. Try turning the Distance knob left and right. Different groups of slices will be triggered rendering the loop more interesting. Try hitting a chord instead of just a note and see how the loop changes. Shift between the 3 different Arpeggiator Transpose modes for a different take. Or just launch the MIDI clip created from the slicing procedure on the previous step and listen to what comes out. A few macro controls were also created when we sliced our loop. These control various useful parameters like the Attack, Start Offset, X-Fade/Snap of our slices. These could be very handy since we might be able to adjust some of them to control any abrupt volume changes or create any gating effects. Some of the Arpeggiator controls could also be mapped to various macro controls for a more performance ready device.
 Step 8: Adding a MIDI Effect – RandomNow, delete the Arpeggiator effect or work on a copy of the previously created drum rack before the Arpeggiator effect has been added. Drag a Random MIDI effect on the newly created track. Set Chance to around 30%, Choices to 6, Scale to 1, Mode to Rnd and Sign to Bi. Fire the MIDI clip and see how slices are randomly being played. You can further adjust values to your liking. Mouse over each Random effect control to get a quick overview of its function at the Info View on the left. If you can’t see it, just go to View->Info.
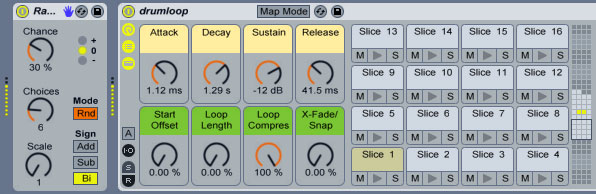 Step 9: Combining MIDI EffectsNow, make another copy of the sliced drumloop channel and add an Arpegiator and a Random MIDI effect. In this example, I changed the Arpegiator Rate value to 1/16. On the Random effect I changed the Chance value to 44%, Choice value to 4 and Scale to 2. Listen to the result and the jazzy/chaotic feeling that the loop now has! Adjust the Sustain and Decay macro knobs to tame the repetitions.
 Listen to the loop so far: Download audio file (drumloop-arpeggiator-random.mp3) Step 10: Stylus RMXFor this last step, you need to own Stylus RMX and ReCycle software. Stylus RMX is a great time groove module from Spectrasonics that can add an infinite amount of rhythmic variation to your loop. It comes with a great library of professionally recorded loops to get your creative juices flowing and it also has some of the best effects I’ve ever heard. This last step is for those lucky owners of this great instrument. To use our existing loop, we need to convert it to a REX file first. REX is the native file format of ReCycle, a software from Propellerheads. Recycle creates files the same way Ableton Live creates files throught the Slice to New MIDI command. A REX file contains the original audio of the loop, the slices you have prepeared in ReCycle, and any effects or processing you have added in ReCycle. Saving an audio file as a REX file also reduces the size of the file significally. This is achieved by applying a “nonlossy” compression algorithm to the file when saved, meaning that it does not compromise the audio quality in any way. So, fire up Recycle and load up the drum loop(included in the source files). Click yes on the prompting to move the left locator to the first slice point. Our original loop is 4 bars, so you have to input this value next to the Bars input box. The tempo detection algorithm might return a slightly different BMP value than the original. That’s not a problem, just correct it inside the respective input box.
 Drag the Sensitivity slider to the value of 73 to create a slice for each drum hit in the loop. According to the loop this slider might need to be set with different values.
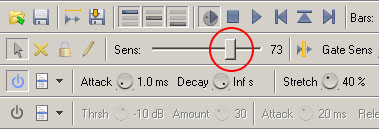 Hit the Play button(just above the Sensitivity slider)to preview the loop. You can further adjust the loop by tweaking the Gate Sens, Pitch and Gain knobs. On top of that, there are 3 effect processes that you can add: Envelope, Transient Shaper and EQ. You can activate/deactivate them from their respective controls on the left and pick any preset settings from their respective drop-down menus. You can also add slices with the Pen Tool, remove slices that are not needed to clean up your file by right clicking and selecting Delete with the Selection Tool, mute slices with the Mute Tool and lock slices to protect them from editing with the Lock Tool. These tools are located on the left side of the Sensitivity control.
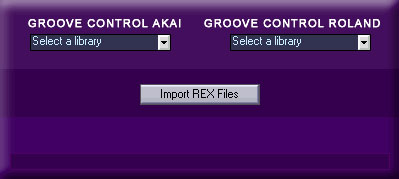
Go to File->Save As… and save the loop under a different name. A new file is created with the .rx2 extension appeneded to it. When you install Stylux RMX another useful program is also installed called Sage Converter. We are going to use this program to convert our REX file to a format Stylus RMX can understand. Load up Sage Converter and click the Import REX Files button. Navigate to the folder where your newly created REX file is located and double click it. A new prompt window appears asking you to enter a new Suite name for your REX files. That’s Stylus RMX’s way of keeping your files organized. Enter a name and click Convert. The new suite is located under the SAGE\SAGE Libraries\User Libraries\Converted REX Files folder. Apologies to Mac users since the path might differ in their machines, it should be similar, though.
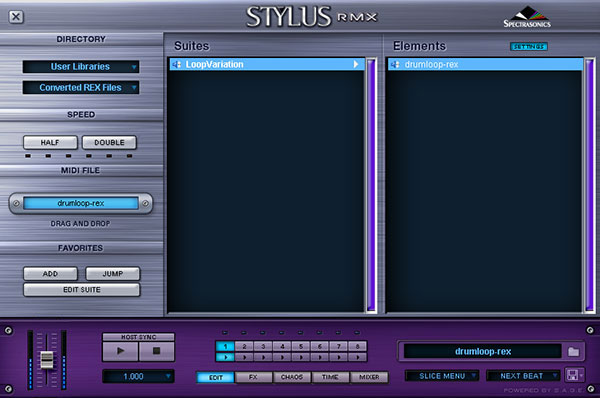
 Load up Stylus RMX as an instrument in Live or the DAW of your choice. Click on the folder icon just under the Stylus RMX title, then from the Directory section on the left, choose User Libraries from the first drop-down menu and Converted REX Files from the second one. The name of the Suite and the REX file appear on the right. Stylus RMX can accomodate up to 8 loops that can be added and mixed at the same time. Our REX loop is loaded on the first channel since it was selected by default. Hit the Play button for the first channel located at the bottom of the Stylus RMX window just over the Edit button to preview the loop. At the left, you can find the DRAG AND DROP area, the blue box with the name of your file. You can click at the name of the drumloop, then drag and drop to an empty area in your MIDI channel in your host. A MIDI file will be created, similar if not identical to the one we created in Step 6 when we used the Slice to New MIDI command. You can play that MIDI file and listen to the loop playing back but now you are able to edit and rearrange the MIDI information to create a rhythmically different clip.
 With the loop now playing the fun starts. Click the CHAOS button to bring up the CHAOS DESIGNER. Activate the module by clicking the button on the left of the title. Start tweaking the controls and listen to how your loop is transformed in real time. Mainly the PATTERN, REPEAT and REVERSE sliders are responsible for the rhythmic variation. Adjust the rest of the sliders to taste to change the timing, pitch and dynamics of the loop as well as add a degree of glitchiness(BUZZ parameter). You can also capture a chaotic performance and either export it as a new MIDI file or drop the resulting MIDI information onto a MIDI channel in your DAW like we did in the previous paragraph. But it doesn’t stop there. By selecting the EDIT GROUP area, you can assign different slices to their own group and process them individually or as a group! So you can assign different chaos values to different groups creating a plethora of rhythmic variations. That also applies to the FX section. You can stack up to 3 effects for each group you create, completely tranforming your beat.
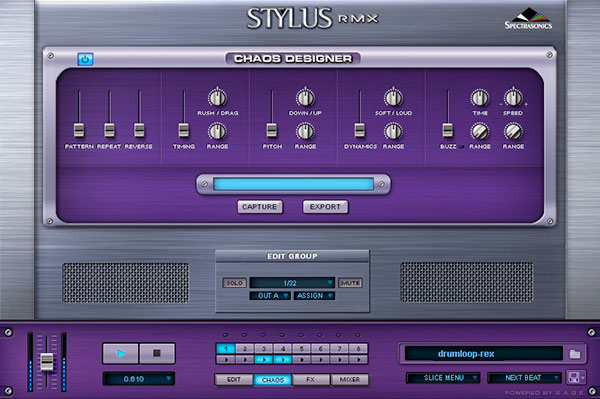 Listen to the loop after processed with Stylus RMX CHAOS engine: Download audio file (drumloop-stylus.mp3) Listen to the loop after processed with Stylus RMX CHAOS engine and extra effects in various EDIT GROUPS: Download audio file (drumloop-stylus-editgroups.mp3) Of course, we barely scratch the surface here as far as this programs potentials for scrambling up your loops. It’s a very creative tool that deserves a tutorial of each own. So there you have it. Try those out with your own loops to see what comes out. Don’t be afraid to experiment. Let me know if you have any questions.
|
| Posted: 30 Jun 2010 09:00 PM PDT June was a stellar month for Tuts+. Mobiletuts+ had recently launched and started off with some great iPhone and Andriod development tutorials. Creative Sessions focused on Digital Illustration this month and started gearing up for July’s Interface Design session. During June a survey was run across all of Tuts+ to give our readers the opportunity to provide some feedback, over 7000 people participated and one was lucky enough to win a $250 Amazon Voucher. Here’s a small sample of the best from Tuts+ this month! Activetuts+ – Flash, Flex and Actionscript Tutorials
Aetuts+ – Adobe After Effects Tutorials
Audiotuts+ – Audio and Production Tutorials
Cgtuts+ – CG and 3D Tutorials
Mobiletuts+ – iPhone, Android, Windows and Blackberry Mobile Development Tutorials
Nettuts+ – Web Development Tutorials
Phototuts+ – Photography and post-processing Tutorials
Psdtuts+ – Adobe Photoshop Tutorials
Vectortuts+ – Adobe Illustrator and Vector Tutorials
Creative Sessions
FreelanceSwitch – Freelance Jobs & Freelancer Directory
|


| You are subscribed to email updates from Audiotuts+ To stop receiving these emails, you may unsubscribe now. | Email delivery powered by Google |
| Google Inc., 20 West Kinzie, Chicago IL USA 60610 | |
AUDIOTUTS Updates Part 1
AUDIOTUTS Updates Part 1
AUDIOTUTS Updates Part 1
Tags: AUDIOTUTS Updates, AUDIOTUTS Updates watch online, full AUDIOTUTS Updates video, AUDIOTUTS Updates download, AUDIOTUTS Updates torrent, free AUDIOTUTS Updates, AUDIOTUTS Updates megavideo, AUDIOTUTS Updates full, AUDIOTUTS Updates eng sub
0 comments:
Post a Comment