AUDIOTUTS Updates |  |

| Workshop #84: The Singular of Multiplicity by Digi-Tall Posted: 18 Jun 2010 05:22 PM PDT At Audiotuts+ we irregularly put up a reader track for workshopping and critique (find out how to submit a track). This is how it works: you upload your song, and every week or so we’ll publish one here and step away from the podium. The floor is yours to talk about the track and how the artist can fix problems in and improve upon the mix and the song. This track has been submitted for your friendly, constructive criticism. They have put their track (and their heart and soul) in your hands to learn and get useful feedback.
The Singular of Multiplicity by Digi-TallDescription of the track: Artist’s website: www.digi-tall.us
Download audio file (01TheSingularOfMultiplicity.mp3) Terms of Use: This track is available for download. Have a listen to the track and offer your constructive criticism for this Workshop in the comments section. Submit Your Tracks for WorkshoppingNeed constructive criticism on your own tracks? Submit them using this form.
|
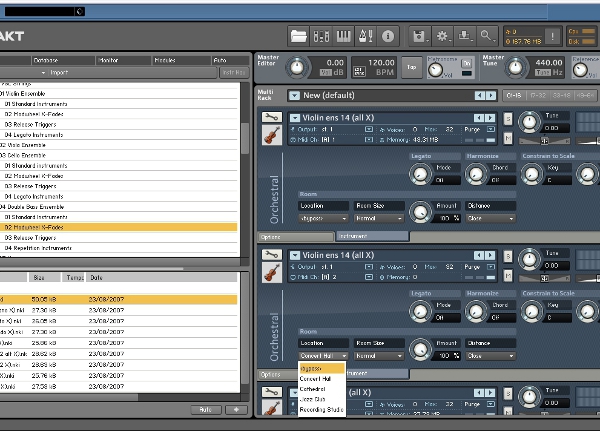
| How to Achieve Realistic Spatial Imaging Using Kontakt Posted: 18 Jun 2010 01:34 AM PDT When you are using sampled instruments, good spatial imaging can make the difference between obviously fake-sounding mixes and a great ensemble sound that is realistic and pleasing to listen to. This is especially important when you are emulating an orchestra or a chamber ensemble. In this tutorial I will show you how to create realistic spatial imaging from scratch. Many sample libraries come with instruments prerecorded in fixed positions in a particular studio or hall. This has the disadvantage of you not being able to create your own custom ensembles and spaces. For this tutorial I will be using Kontakt. Kontakt comes with a good selection of instruments from the VSL (Vienna Symphonic Library) and allows you to configure all spatial aspects of the instruments individually. Note: The changes made in each step can make fairly subtle differences that might not be audible on first hearings in the examples. However, added together they are a powerful toolkit for creating an impression of space and depth. Step 1Open a new project. Load Kontakt as an instrument. Then inside Kontakt load two instances of the Violin ens 14 (all X) instrument (for Violins 1 and 2), and one instance each of Viola ens 10 (all X), Cello ens 8 (all X) as well as Bass ens 6 (all X). This gives us a basic medium-sized string ensemble.
 Audio Example 1: Strings with factory settings. Step 2As we want to customize the ensemble to our own needs, we are going to take out the reverb that is assigned to each instrument in Kontakt by setting the reverb for each instrument (Violin 1, 2, Viola, Cello and Bass) to “bypass”.
 Audio Example 2: Strings without reverb. Step 3Right now the instruments are all panned to the centre which does not reflect how they are laid out in an orchestra. So we’re going to spread them out. Adjust the stereo position so that they are as follows: Violin 1 – L50, Violin 2 – L25, Viola – 0, Cello – R25, Bass – R50.
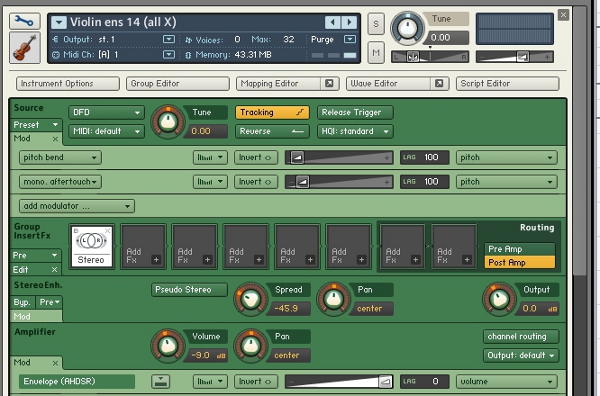
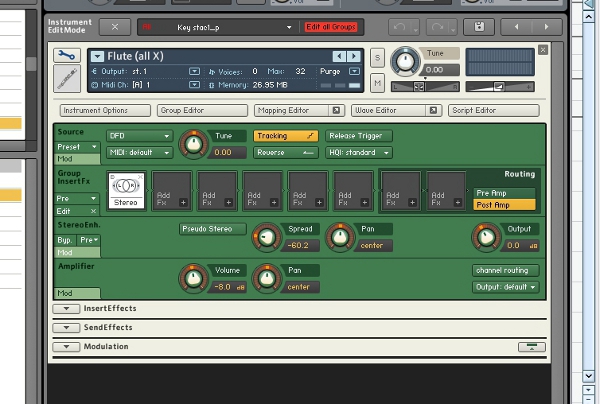
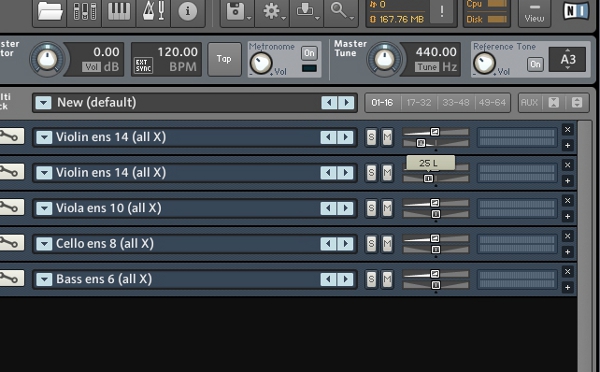 Audio Example 3: Strings panned. Step 4Now the instruments are in the right place, but if you listen carefully, they are too wide. This is because each individual section is recorded in full stereo width – this would be appropriate if we were replicating the sound you could hear standing right in front of one section only, but this is not how they appear in an ensemble. We are going to use Kontakt’s Stereo Modeller to reduce the width of each section. To do this, add the Stereo Modeller for each instrument in the Group Fx chain and move the “Spread” wheel to a setting of around -45.
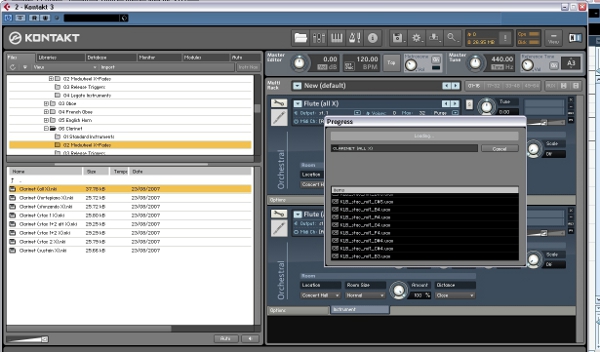
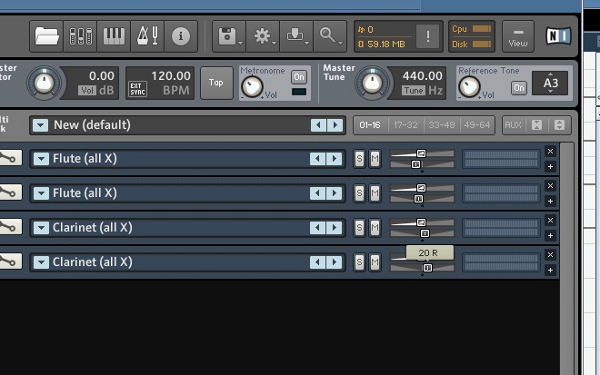
 Audio Example 4: Strings stereolimited. Step 5Now we’re going to add a second group of instruments. Add another Kontakt player as a Cubase instrument and load two instances each of Flute (all X) and Clarinet (all X). This will give us a small woodwind section with double flutes and clarinets. Make sure the master volume for this player is substantially lower than for the strings as it contains only 4 players versus the 52 players in the string section! Also, set the “Location” setting for each instance’s reverb to “bypass”.
 Audio Example 5: Strings with woodwind factory settings. Step 6As with the strings, pan the different woodwind instruments to different positions. Bear in mind that each one is only an individual instrument and they are positioned behind the strings, so the total angle is smaller than for the strings (L50 to R50). Let’s go with something like L36, L18, R18, R36 for flutes 1 and 2 and clarinet 1 and 2 in that order.
 Audio Example 6: Strings with woodwind panned. Step 7Again, as with the strings, adjust the stereo width of flutes and clarinets with the help of the stereo modeller. Since we are dealing with actual individual instruments whose stereo image is narrower than that for a whole section, use stronger settings for this (-60).
 Audio Example 7: Strings with woodwind panned and stereolimited. Step 8Now we are going to use a little trick to add to the sense of depth. In an orchestra pit, the woodwinds are behind the strings. This means that the soundwaves from it reach the audience slightly later than those of the strings. We can use this fact to our advantage by delaying the whole woodwind section by a few milliseconds. To do this, add Cubase’s MonoDelay plugin in the Insert Chain for the Woodwind section Kontakt player, with the following settings: Delay: 20, Feedback: 0, Lo Filter: off, Hi: Filter: off, Mix: 100.
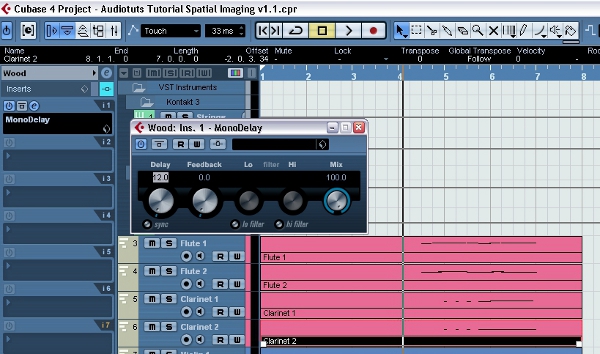 Audio Example 8: Strings with woodwind delayed. Step 9There is another fact about how sound travels that we can exploit to add to the sense of depth. Higher frequencies move through air less easily than lower frequencies. This means that a sound source that is a certain distance away loses high frequency content. So by inserting a gentle EQ with a high shelf around 4000Hz and gain of around -3 into the Woodwind Insert Chain we can reinforce the impression of the woods being further away from the strings.
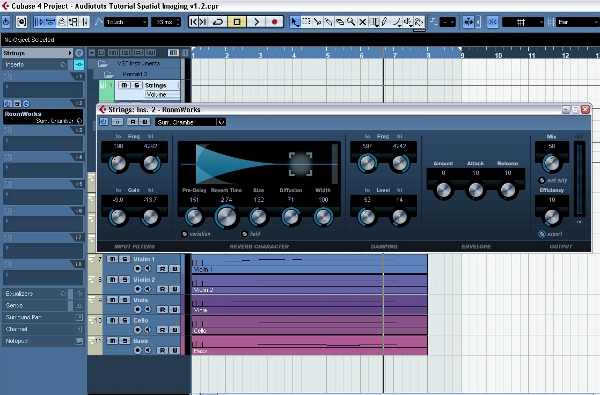
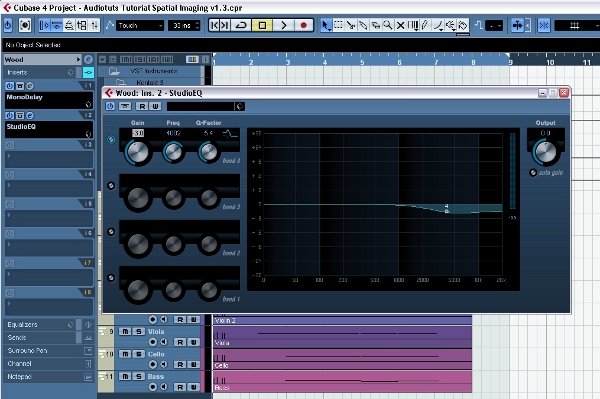 Audio Example 9: Strings with woodwind EQed. Step 10This almost completes our tutorial. To finish off the spatial imaging, we are now going to add reverb to both sections. Cubase’s “RoomWorks” reverb plugin has some good “Surround” presets that are natural-sounding spaces and great to use on an orchestra. Add an instance of the plugin to the Insert Chain of both Strings and Woodwinds. I’ve chosen the “Surround Chamber” preset because it goes with the small ensemble sound we’ve been creating.
 Audio Example 10: Strings and woodwind final result. That’s it! We’ve created a fairly realistic medium-size ensemble sound from scratch, with two sections at different depths. You can now take the same principles and apply them to any kind of ensemble/band you want to emulate. For example, you could add a brass or percussion section with more extreme delay and EQ high frequency shelf settings than the woodwinds to place them in the third “row”, so to speak.
|
| You are subscribed to email updates from Audiotuts+ To stop receiving these emails, you may unsubscribe now. | Email delivery powered by Google |
| Google Inc., 20 West Kinzie, Chicago IL USA 60610 | |
AUDIOTUTS Updates Part 1
AUDIOTUTS Updates Part 1
AUDIOTUTS Updates Part 1
Tags: AUDIOTUTS Updates, AUDIOTUTS Updates watch online, full AUDIOTUTS Updates video, AUDIOTUTS Updates download, AUDIOTUTS Updates torrent, free AUDIOTUTS Updates, AUDIOTUTS Updates megavideo, AUDIOTUTS Updates full, AUDIOTUTS Updates eng sub
0 comments:
Post a Comment